Mastering Shortbread Crust: The Foundation for Perfect Pies, Tarts & Bars
Few dessert bases offer the comforting richness and delicate crumb of a classic shortbread crust. Originating from the misty highlands of Scotland, this humble yet versatile foundation is cherished for its simple elegance and profound buttery flavor. Traditionally crafted from just three essential ingredients – flour, butter, and sugar – shortbread provides an exquisite contrast to a myriad of fillings, making it the perfect choice for everything from creamy cheesecakes to vibrant fruit tarts and decadent dessert bars. If you've ever dreamt of creating desserts with that signature melt-in-your-mouth texture and irresistible aroma, mastering the art of the shortbread crust recipe is your key. This comprehensive guide will walk you through every step, from selecting your ingredients to perfecting your bake, ensuring your homemade treats are nothing short of extraordinary.The Essential Shortbread Crust Recipe: Ingredients You'll Need
Achieving a truly exceptional shortbread crust begins with understanding the role of each component. While the core is minimalist, precise measurements and quality ingredients make all the difference. Here’s a detailed look at what you’ll need for our quintessential shortbread crust recipe:- 1 cup (2 sticks) Unsalted Butter, at room temperature: Butter is the star of shortbread, delivering its signature flavor and tender texture. Unsalted butter allows you to control the salt content, while room temperature butter is crucial for proper creaming, incorporating air, and creating a light, fluffy mixture. Avoid melted butter, as this will result in a greasy, dense crust.
- 1/2 cup Granulated Sugar: This provides sweetness and contributes to the crust's structure and golden color during baking.
- 1/4 cup Powdered Sugar (Confectioners' Sugar): The finer particles of powdered sugar dissolve more readily and help create a wonderfully tender, almost delicate crumb, enhancing the melt-in-your-mouth quality of the shortbread.
- 2 cups All-Purpose Flour: The structural backbone of the crust. Ensure it's measured correctly – spooned into the measuring cup and leveled off, rather than scooped directly from the bag, which can compact it and lead to excess flour.
- 1/4 teaspoon Salt: A small but mighty ingredient that balances the sweetness and enhances the overall flavor profile of the butter. Don't skip it!
- 1 teaspoon Vanilla Extract (optional, but highly recommended): While traditional shortbread often omits it, a good quality vanilla extract deepens the flavor, adding a warm, aromatic note that complements the butter beautifully.
- 1/2 cup Chopped Pecans (optional): For an added layer of texture and nutty flavor, toasted and finely chopped pecans (or other nuts like walnuts or almonds) can be folded into the dough. This creates a more complex and satisfying base, especially for rich, creamy fillings.
Step-by-Step Guide to a Flawless Shortbread Crust
Crafting your shortbread crust is a straightforward process, but paying attention to each step ensures optimal results. Follow these instructions for a perfect base every time.- Prepare Your Ingredients & Oven: First, ensure your unsalted butter has softened to room temperature – it should yield slightly when pressed but not be oily or melted. Preheat your oven to a consistent 350°F (175°C). This ensures the crust starts baking immediately and evenly.
- Cream the Butter and Sugars: In a large mixing bowl, combine the softened butter, granulated sugar, and powdered sugar. Using an electric mixer (stand or hand-held) on medium speed, beat the mixture for about 3-4 minutes until it becomes noticeably light, fluffy, and pale in color. This creaming process is vital; it incorporates air, which contributes to the shortbread's delicate texture. The powdered sugar, as mentioned, aids in this tenderness.
- Incorporate the Dry Ingredients: Reduce your mixer speed to low. Gradually add the all-purpose flour and salt to the butter mixture, mixing just until the ingredients are combined. Over-mixing at this stage can develop the gluten in the flour, leading to a tough, less crumbly crust. If you're including vanilla extract or chopped pecans, fold them in now. The dough will look slightly crumbly but should come together when pressed between your fingers.
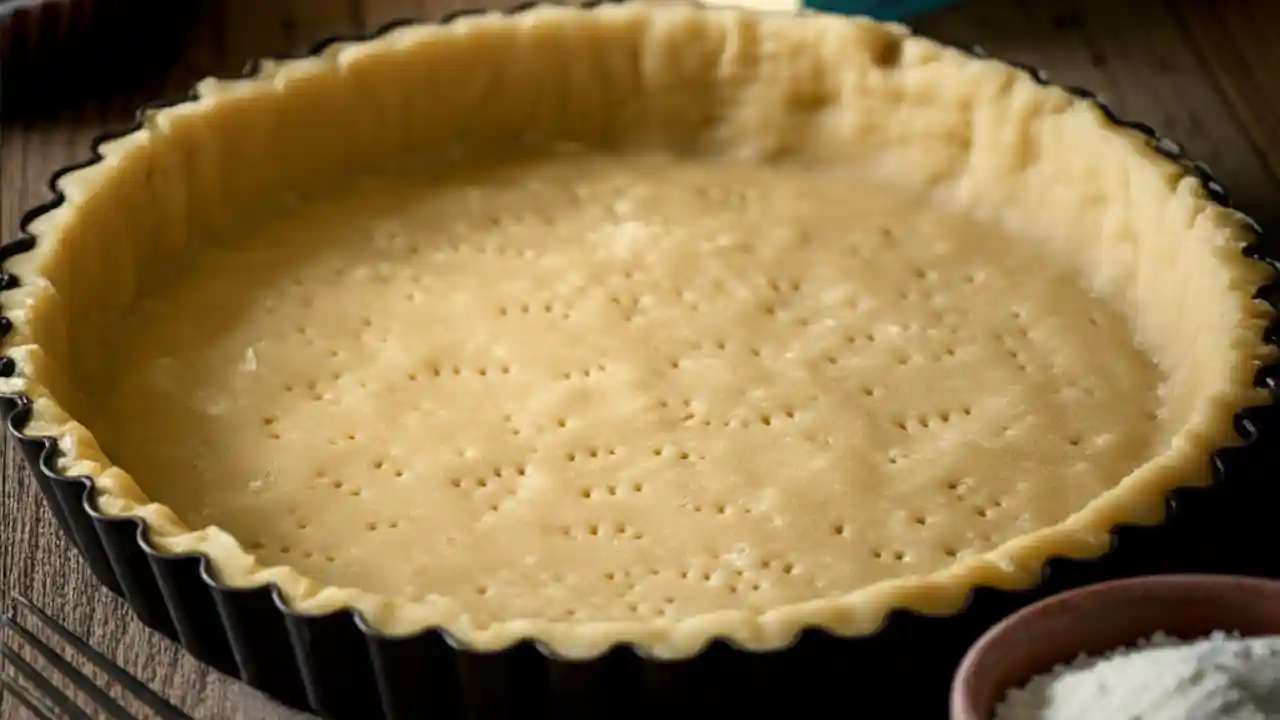
- Form the Crust: Transfer the dough to your chosen baking vessel – a tart pan, pie dish, or a square/rectangular baking dish. Using the bottom of a flat measuring cup or your knuckles, press the dough evenly into the bottom of the pan and slightly up the sides (if making a pie or tart). Aim for a uniform thickness across the entire base to ensure even baking. A consistent layer prevents some areas from burning while others remain undercooked.
- Bake the Crust to Golden Perfection: Place your prepared crust in the preheated oven. Bake for 20-25 minutes, or until the edges are beautifully light golden brown. Keep a close eye on it during the last few minutes, as ovens can vary. The subtle color change signals that the crust is baked through and has developed its full, rich flavor.
- For no-bake fillings: Allow the crust to cool completely in the pan on a wire rack before adding any chilled or no-bake fillings. This prevents your filling from melting and ensures the crust maintains its crisp texture.
- For baked fillings: You can often proceed directly with your recipe, adding the filling to the warm crust, as directed by your specific dessert instructions.
Mastering Your Shortbread Crust Recipe: Expert Tips & Creative Variations
While the basic shortbread crust recipe is straightforward, a few expert tips can elevate your results, and creative variations can unlock a world of dessert possibilities.Tips for Perfect Shortbread Crust Every Time
- Temperature is Key: Reiterate the importance of room temperature butter. If your kitchen is warm, you might even consider chilling your mixing bowl and beaters briefly.
- Mindful Mixing: Avoid the temptation to over-mix the dough after adding the flour. Over-mixing develops gluten, leading to a tough, bready crust rather than a tender, crumbly one. Mix only until just combined.
- The Power of Chilling: For a crisper, more defined crust, especially in tart pans with fluted edges, chill the pressed dough in the pan for 15-30 minutes before baking. Chilling firms up the butter, which helps prevent the crust from shrinking excessively in the oven and maintains its shape. It also results in a more delicate crumb.
- Uniform Thickness: Use the bottom of a flat measuring cup or a small roller to press the dough evenly into the pan. This ensures consistent baking and texture throughout the crust.
- Blind Baking for Wet Fillings: If your filling is particularly wet (like a custard or a fruit filling that releases a lot of moisture), consider blind baking your crust. Prick the bottom of the unbaked crust with a fork, line it with parchment paper, and fill it with pie weights or dried beans. Bake for 10-15 minutes, remove the weights and parchment, then bake for another 5-10 minutes until lightly golden. This step prevents a soggy bottom.
Versatile Applications & Flavor Enhancements
The beauty of this shortbread crust recipe lies in its adaptability. It's truly a chameleon in the dessert world:
- Shortbread Crust for Cheesecake: The rich, buttery notes of shortbread provide an ideal counterpoint to the tangy sweetness of cheesecake fillings. It offers a more sophisticated base than traditional graham cracker crusts.
- Shortbread Crust for Bars: For treats like lemon bars, pecan bars, or even chocolate caramel bars, this crust offers a sturdy yet tender foundation that holds up well to slicing and serving. Its crumbly texture contrasts beautifully with gooey or creamy bar fillings.
- Fillings for Shortbread Pie Crust: The possibilities are endless! Think beyond traditional fruit pies. Shortbread crust shines with chocolate ganache, lemon curd, pastry cream, or fresh berries and cream. The richness of the crust pairs exceptionally well with bright, tangy, or intensely flavored fillings. For those interested in simplifying further, explore the details of a three-ingredient shortbread crust.
- Nutty Variations: Beyond pecans, experiment with finely chopped walnuts, almonds, or pistachios for different flavor profiles. Toasting the nuts before adding them to the dough intensifies their flavor significantly.
- Aromatic Additions: Consider adding a teaspoon of almond extract for a marzipan-like nuance, or the zest of a lemon or orange for a bright, citrusy lift. A pinch of ground cinnamon or cardamom can also add warmth and complexity, especially when paired with apple or pear fillings.
Whether you're crafting a chilled dessert or a baked masterpiece, understanding the nuances of a baked or no-bake shortbread crust is key to dessert success.
Frequently Asked Questions About Shortbread Crust
Q: Can I make this shortbread crust gluten-free?
A: Yes! You can substitute the all-purpose flour with a 1:1 gluten-free baking flour blend that contains xanthan gum. The texture might be slightly different, but it will still be delicious and hold up well.
Q: My shortbread crust turned out tough. What went wrong?
A: The most common culprit for a tough crust is over-mixing the dough once the flour has been added. Over-mixing develops gluten, leading to a chewy, rather than crumbly, texture. Always mix just until the flour is incorporated.
Q: Can I prepare the shortbread crust dough in advance?
A: Absolutely! You can prepare the dough, wrap it tightly in plastic wrap, and refrigerate it for up to 3-4 days. Allow it to come to room temperature for about 15-20 minutes before pressing it into the pan. You can also press the dough into the pan, chill it, and then freeze the unbaked crust for up to a month, wrapped well. Thaw in the refrigerator before baking.
Q: Why did my crust shrink during baking?
A: Shrinkage is often caused by not chilling the dough adequately before baking or by over-working the dough. Chilling relaxes the gluten and firms the butter, helping the crust hold its shape. Ensure your dough isn't too warm when it goes into the oven.
Q: How can I prevent the edges of my tart crust from browning too quickly?
A: If you notice the edges browning much faster than the rest of the crust, you can create a foil "collar" or use a pie shield to cover the edges for the last part of the baking time. This protects them from direct heat while the center finishes baking.
